Private VLAN (PVLAN) on Cisco IOS Switch

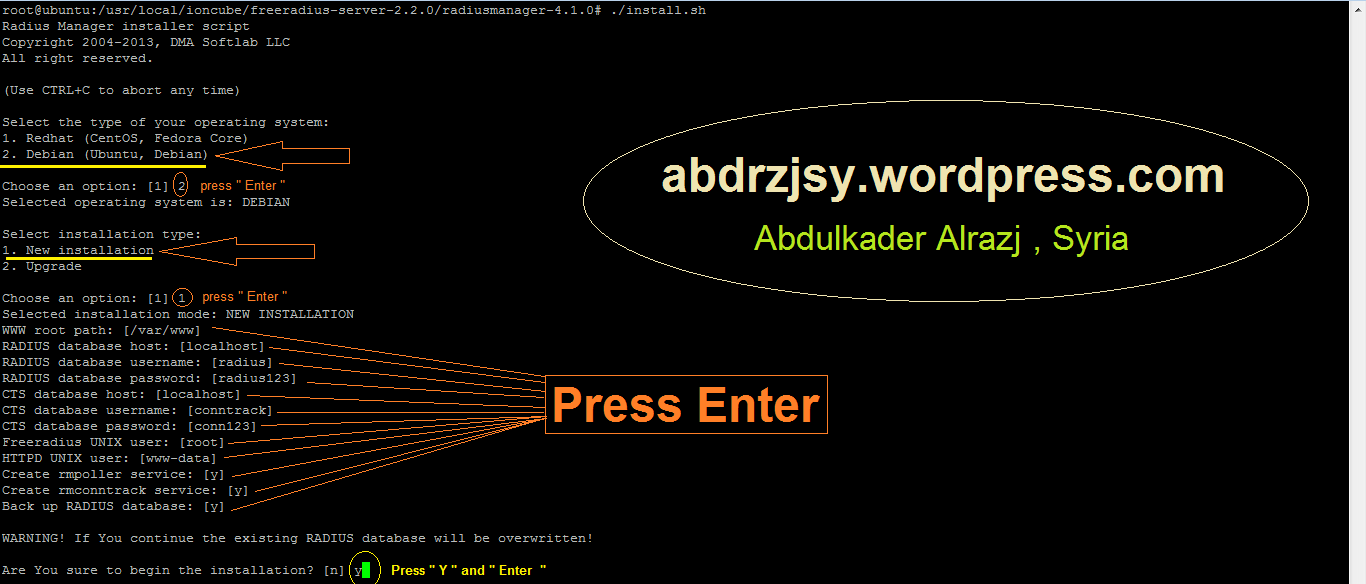
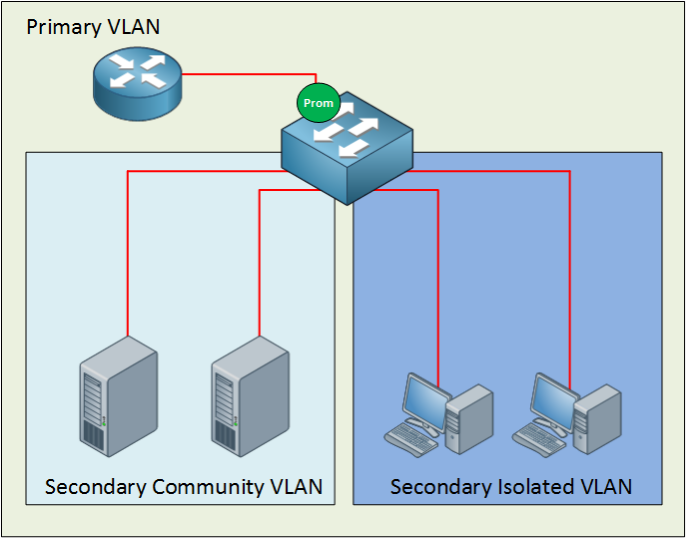
In a previous lesson, I explained the protected port feature on Cisco Catalyst Switches. This time we will look at the private VLAN which I can best describe as protected ports on steroids. If you have no idea what a protected port or VLAN is, I highly recommend to read my previous lesson first. Having said that, let’s get started with a nice topology picture:


Many network students believe private VLANs are very complex when they see this for the first time. I’m going to break it down and explain to you how it works.
The private VLAN always has one primary VLAN. Within the primary VLAN you will find the promiscuous port. In my picture above you can see that there’s a router connected to a promiscuous port. All other ports are able to communicate with the promiscuous port. Within the primary VLAN you will encounter one or more secondary VLANs, there are two types:

  • Community VLAN: All ports within the community VLAN are able to communicate with each other and the promiscuous port.
  • Isolated VLAN: All ports within the isolated VLAN are unable to communicate with each other but they can communicate with the promiscuous port.
Isolated Island with House


The names for these secondary VLANs are well-chosen if you ask me. In a community, everyone is able to talk to each other. When you are isolated you can only talk to yourself or in case of our private VLANs…the promiscuous port.


Secondary VLANS can always communicate with the promiscuous port but they can never communicate with other secondary VLANs! Are you following me so far? If so…good! If you are still a little fuzzy, don’t worry. I’m going to show you the configuration and demonstrate to you how this works.
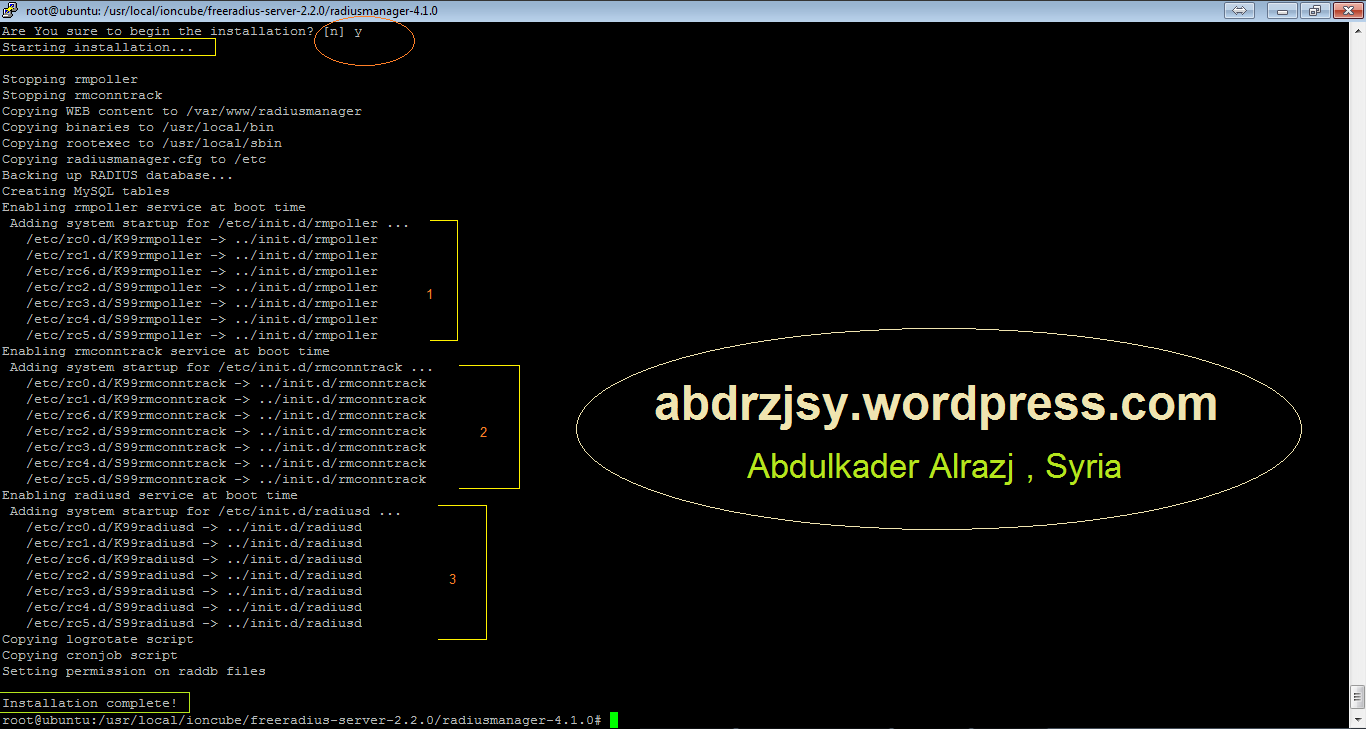
Configuration

First let me show you the topology that I will use for this demonstration:

private vlan configuration example topology

Let me sum up what we have here:

  • The primary VLAN has number 500.
  • The secondary community VLAN has number 501.
  • The secondary isolated VLAN has number 502.
  • I just made up these VLAN numbers; you can use whatever you like.
  • H1 and H2 in the community VLAN should be able to reach each other and also the server connected to the promiscuous port.
  • H3 and H4 in the isolated VLAN can only communicate with the server on the promiscuous port.
  • The server should be able to reach all ports.

Let’s get started!

SW1(config)#vtp mode transparent
Setting device to VTP TRANSPARENT mode.

Configuring private VLANs requires us to change the VTP mode to Transparent.

SW1(config)#vlan 501
SW1(config-vlan)#private-vlan community
SW1(config-vlan)#vlan 500
SW1(config-vlan)#private-vlan primary
SW1(config-vlan)#private-vlan association add 501

Let’s start with the configuration of the community VLAN. First I create VLAN 501 and tell the switch that this is a community VLAN by typing the private-vlan community command. Secondly I am creating VLAN 500 and configuring it as the primary VLAN with the private-vlan primary command. Last but not least I need to tell the switch that VLAN 501 is a secondary VLAN by using the private-vlan association command.

SW1(config)#interface range fa0/1 - 2
SW1(config-if-range)#switchport mode private-vlan host
SW1(config-if-range)#switchport private-vlan host-association 500 501

Interface fa0/1 and fa0/2 are connected to H1 and H2 and belong to the community VLAN 501. On the interface level I need to tell the switch that these are host ports by issuing the switchport mode private-vlan host command. I also have to use the switchport private-vlan host-association command to tell the switch that VLAN 500 is the primary VLAN and 501 is the secondary VLAN.

SW1(config)#interface fa0/24
SW1(config-if)#switchport mode private-vlan promiscuous
SW1(config-if)#switchport private-vlan mapping 500 501

This is how I configure the promiscuous port. First I have to tell the switch that fa0/24 is a promiscuous port by typing the switchport mode private-vlan promiscuous command. I also have to map the VLANs by using the switchport private-vlan mapping command. Here is the output for FastEthernet 0/1:

SW1#show interfaces fastEthernet 0/1 switchport
Name: Fa0/1
Switchport: Enabled
Administrative Mode: private-vlan host
Operational Mode: down
Administrative Trunking Encapsulation: negotiate
Negotiation of Trunking: Off
Access Mode VLAN: 1 (default)
Trunking Native Mode VLAN: 1 (default)
Administrative Native VLAN tagging: enabled
Voice VLAN: none
Administrative private-vlan host-association: 500 (VLAN0500) 501 (VLAN0501)
Administrative private-vlan mapping: none

We can verify our configuration by looking at the switchport information. Interface fa0/2 has the same configuration as fa0/1.

SW1#show interface fa0/24 switchport
Name: Fa0/24
Switchport: Enabled
Administrative Mode: private-vlan promiscuous
Operational Mode: private-vlan promiscuous
Administrative Trunking Encapsulation: negotiate
Operational Trunking Encapsulation: native
Negotiation of Trunking: Off
Access Mode VLAN: 1 (default)
Trunking Native Mode VLAN: 1 (default)
Administrative Native VLAN tagging: enabled
Voice VLAN: none
Administrative private-vlan host-association: none
Administrative private-vlan mapping: 500 (VLAN0500) 501 (VLAN0501)

Here is the switchport information for fa0/24 (our promiscuous port). You can see the mapping information.

SW1#show vlan private-vlan
Primary Secondary Type Ports
------- --------- ----------------- -----------------------------------------
-
500 501 community Fa0/1, Fa0/2, Fa0/24

The show vlan private-vlan command gives us valuable information. You can see that VLAN 500 is the primary VLAN and 501 is the secondary VLAN. It also tells us whether the
VLAN is a community or isolated VLAN the ports.

SW1#show vlan private-vlan type
Vlan Type
---- -----------------
500 primary
501 community

I also like the show vlan private-vlan type command because it gives us a quick overview of the private VLANs.

So what’s the result of this configuration?

If everything is OK we should now have a working community VLAN…let’s find out!

C:Documents and SettingsH1>ping 192.168.1.2
Pinging 192.168.1.2 with 32 bytes of data:
Reply from 192.168.1.2: bytes=32 time<1ms TTL=128

H1 is able to reach H2.

C:Documents and SettingsH1>ping 192.168.1.254
Pinging 192.168.1.254 with 32 bytes of data:
Reply from 192.168.1.254: bytes=32 time<1ms TTL=128

H1 can also reach the server behind the promiscuous port.

C:Documents and SettingsS1>ping 192.168.1.2
Pinging 192.168.1.2 with 32 bytes of data:
Reply from 192.168.1.2: bytes=32 time<1ms TTL=128

The server is able to reach H2. Great! Our community VLAN seems to be up and running. Let’s continue with the configuration of the isolated VLAN.

SW1(config)#vlan 502
SW1(config-vlan)#private-vlan isolated
SW1(config-vlan)#vlan 500
SW1(config-vlan)#private-vlan primary
SW1(config-vlan)#private-vlan association add 502

The configuration is the same as the community VLAN but this time I’m using the private vlan isolated command. Don’t forget to add the association between the primary and secondary VLAN using the private-vlan association add command. The private-vlan primary command is obsolete because I already did this before, I’m just showing it to keep the configuration complete.

SW1(config)#interface range fa0/3 - 4
SW1(config-if-range)#switchport mode private-vlan host
SW1(config-if-range)#switchport private-vlan host-association 500 502

This part is exactly the same as the configuration for the community VLAN but I’m configuring interface fa0/3 and fa0/4 which are connected to H3 and H4.

SW1(config)#interface fa0/24
SW1(config-if)#switchport mode private-vlan promiscuous
SW1(config-if)#switchport private-vlan mapping 500 502

I already configured fa0/24 as a promiscuous port but I’m showing it here as well to keep the configuration complete. I do need to create an additional mapping between VLAN 500 (primary) and VLAN 502 (secondary).

Let’s verify our work!

SW1#show interfaces fa0/3 switchport
Name: Fa0/3
Switchport: Enabled
Administrative Mode: private-vlan host
Operational Mode: down
Administrative Trunking Encapsulation: negotiate
Negotiation of Trunking: Off
Access Mode VLAN: 1 (default)
Trunking Native Mode VLAN: 1 (default)
Administrative Native VLAN tagging: enabled
Voice VLAN: none
Administrative private-vlan host-association: 500 (VLAN0500) 502 (VLAN0502)
Administrative private-vlan mapping: none

Looking good…we can see the host-association between VLAN 500 and 502.

SW1#show interfaces fastEthernet 0/4 switchport | include host-as
Administrative private-vlan host-association: 500 (VLAN0500) 502 (VLAN0502)

A quick look at fa0/4 shows me the same output as fa0/3.

SW1#show interfaces fa0/24 switchport
Name: Fa0/24
Switchport: Enabled
Administrative Mode: private-vlan promiscuous
Operational Mode: private-vlan promiscuous
Administrative Trunking Encapsulation: negotiate
Operational Trunking Encapsulation: native
Negotiation of Trunking: Off
Access Mode VLAN: 1 (default)
Trunking Native Mode VLAN: 1 (default)
Administrative Native VLAN tagging: enabled
Voice VLAN: none
Administrative private-vlan host-association: none
Administrative private-vlan mapping: 500 (VLAN0500) 501 (VLAN0501) 502
(VLAN0502)

We can now see that VLAN 501 and VLAN 502 are mapped to primary VLAN 500.

SW1#show vlan private-vlan
Primary Secondary Type Ports
------- --------- ----------------- -----------------------------------------
-
500 501 community Fa0/1, Fa0/2, Fa0/24
500 502 isolated Fa0/3, Fa0/4, Fa0/24

Here’s a nice clean overview which shows us all the VLANs, the mappings and the interfaces.

SW1#show vlan private-vlan type
Vlan Type
---- -----------------
500 primary
501 community
502 isolated

Or if you only care about the VLAN numbers and the VLAN type this is what you need.

What will the result be of our hard labor?

C:\Documents and Settings\H3>ping 192.168.1.254
Pinging 192.168.1.254 with 32 bytes of data:
Reply from 192.168.1.254: bytes=32 time<1ms TTL=128

H3 can reach the server behind the promiscuous port.

C:\Documents and Settings\H4>ping 192.168.1.254
Pinging 192.168.1.254 with 32 bytes of data:
Reply from 192.168.1.254: bytes=32 time<1ms TTL=128

H4 can also reach the server behind the promiscuous port.

C:\Documents and Settings\H3>ping 192.168.1.4
Pinging 192.168.1.4 with 32 bytes of data:
Request timed out.
Ping statistics for 192.168.1.4:
Packets: Sent = 1, Received = 0, Lost = 1 (100% loss),

There is no reachability between H3 and H4 because they are in the isolated VLAN.

#abdulkader-alrezej, #cisco

Install DMASOFTLAB Radius Manager On Ubuntu 10.04

  • Install DMASOFTLAB Radius Manager On Ubuntu 10.04 Step By Step .
  • DMASOFTLAB Radius Manager 4.1 Short reference manual guide for UBUNTU 10.4  32 /64 Bit Version

1

  • If you have 64bit Ubuntu , then you have to download compatible 64bit packages from the DMA Softlab download section , just note down the 32bit files in this guide, and download 64bit version of same package from the DMA .
  • After you have installed Ubuntu, configure IP address and enable internet access on it .

The tools we need to work : 1- Ubuntu Server 10 , 2- Putty , 3- WinSCP
++++++ Link Of Ubuntu 10.04 +++++++
32 bit : http://old-releases.ubuntu.com/releases/10.04.0/ubuntu-10.04-server-i386.iso
64 bit : http://old-releases.ubuntu.com/releases/10.04.0/ubuntu-10.04-server-amd64.iso
++++++ Link Of Putty ++++++
32 bit : https://the.earth.li/~sgtatham/putty/latest/w32/putty-0.70-installer.msi
64 bit https://the.earth.li/~sgtatham/putty/latest/w64/putty-64bit-0.70-installer.msi
++++++ Link WinSCP ++++++
https://winscp.net/download/files/201707301243dd774dde980e8c1a695529a109a2f563/WinSCP-5.9.6-Portable.zip

Step-1
Access To Terminal Ubuntu by Putty , enter the username and password you entered during the installation of the system , You must change the root password to access all Ubuntu privileges , Follow the following commands :
sudo passwd root
Enter password 1212 for example ,As shown in the picture below .
1

Step-2
In the beginning you should go to the following address ” /etc/apt/sources.list ” in Ubuntu 10.04 By the following application WinSCP  , As shown in the picture below

The ” sources.list ” must be cleared and replaced with the attached code
#Edit Link By Abdulkader Alrazj , Old Releases Ubuntu Update 20-7-2017 >>> facebook.com/groups/arab.network.forum <<<<<
deb http://old-releases.ubuntu.com/ubuntu/ natty main restricted
deb-src http://old-releases.ubuntu.com/ubuntu/ natty main restricted
deb http://old-releases.ubuntu.com/ubuntu/ natty-updates main restricted
deb-src http://old-releases.ubuntu.com/ubuntu/ natty-updates main restricted
deb http://old-releases.ubuntu.com/ubuntu/ natty universe
deb-src http://old-releases.ubuntu.com/ubuntu/ natty universe
deb http://old-releases.ubuntu.com/ubuntu/ natty-updates universe
deb-src http://old-releases.ubuntu.com/ubuntu/ natty-updates universe
deb http://old-releases.ubuntu.com/ubuntu/ natty multiverse
deb-src http://old-releases.ubuntu.com/ubuntu/ natty multiverse
deb http://old-releases.ubuntu.com/ubuntu/ natty-updates multiverse
deb-src http://old-releases.ubuntu.com/ubuntu/ natty-updates multiverse
deb http://old-releases.ubuntu.com/ubuntu natty-security main restricted
deb-src http://old-releases.ubuntu.com/ubuntu natty-security main restricted
deb http://old-releases.ubuntu.com/ubuntu natty-security universe
deb-src http://old-releases.ubuntu.com/ubuntu natty-security universe
deb http://old-releases.ubuntu.com/ubuntu natty-security multiverse
deb-src http://old-releases.ubuntu.com/ubuntu natty-security multiverse

As shown in the picture below
1

Step-3
sudo -i
enter the password you entered during the installation of the system
apt-get update
It must be , As shown in the picture below
1
update is Done ;
1

Step-4
Install the required packages in one step using the command below :
apt-get install mc wget rcconf make gcc mysql-server mysql-client libmysqlclient15-dev libperl-dev curl php5 php5-mysql php5-cli php5-curl php5-mcrypt php5-gd php5-snmp freeradius-mysql apache2 apache2.2-common php5-cli
After this operation, 194MB of additional disk space will be used.
Do you want to continue [Y/n]?
Enter the option y
also enter the password for mysql twice, when requested , As shown in the picture below :
1
If you see the following message as shown in the picture , just press ” Enter ”
1
All packages are installed , As shown in the picture below :
1

Step-5
Download and install the system files library from the company website, choose libraries according to your system environment whether 32 or 64 bit , Please enter Command of numbers from 1 to 4 in the order :
***** 32 Bit OS *******
1 wget http://www.dmasoftlab.com/cont/download/libltdl3_1.5.24-1ubuntu1_i386.deb
2 wget http://www.dmasoftlab.com/cont/download/libltdl3-dev_1.5.24-1ubuntu1_i386.deb
3 dpkg -i libltdl3_1.5.24-1ubuntu1_i386.deb
4 dpkg -i libltdl3-dev_1.5.24-1ubuntu1_i386.deb

***** 64 Bit OS *******
1 wget http://dmasoftlab.com/cont/download/libltdl3_1.5.26-1ubuntu1_amd64.deb
2 wget http://dmasoftlab.com/cont/download/libltdl3-dev_1.5.26-1ubuntu1_amd64.deb
3 dpkg -i libltdl3_1.5.26-1ubuntu1_amd64.deb
4 dpkg -i libltdl3-dev_1.5.26-1ubuntu1_amd64.deb
files library is installed , As shown in the picture below:
1

Step-6
Installation procedure of ionCube runtime system , Radius Manager requires ionCube runtime system , choose ionCube loader according to your system environment whether 32 or 64 bit .
In the beginning you should go to the following address :
1 cd /usr/local
***** 32 Bit OS *******
1 wget http://www.dmasoftlab.com/cont/download/ioncube_loaders_lin_x86.tar.gz
2 tar -xvf ioncube_loaders_lin_x86.tar.gz
3 cd ioncube
4 cp loader-wizard.php /var/www
***** 64 Bit OS *******
1wget http://www.dmasoftlab.com/cont/download/ioncube_loaders_lin_x86-64.tar.gz
2 tar -xvf ioncube_loaders_lin_x86-64.tar.gz
3 cd ioncube
4 cp loader-wizard.php /var/www
Test the ionCube loader from shell :
php -v
Assuming You have configured ionCube properly You have to see the correct ionCube version :
1

  • And finally Add the appropriate ionCube loader to your php.ini

1 echo "zend_extension=/usr/local/ioncube/ioncube_loader_lin_5.3.so" >> /etc/php5/apache2/php.ini
2 echo "zend_extension=/usr/local/ioncube/ioncube_loader_lin_5.3.so" >> /etc/php5/cli/php.ini
add is done , As shown in the picture below :
1

  • Now you must restart Apache2 Server Continue inserting this command :

service apache2 restart
ِApache Server restored , As shown in the picture below :
1

  • Now Check Ioncube Loader file in Web Interface , By going to the following address :

Your-IP-Address/loader-wizard.php

  • Loader Installed , PHP is Work , As shown in the picture below :

1

Step-7

  • Installation procedure of FreeRadius , Radius Manager requires the latest FreeRadius 2.2.0 DMA patch. This custom built FreeRadius , is prepared and tested by our software engineers and guarantees 100% compatibility with Radius

Manager , Other versions and builds are incompatible, do not use them. If your host already has a different
FreeRadius version installed, remove it completely (including the configuration files /usr/local/etc/raddb).

  • Follow the installation steps below to successfully build, install and configure FreeRadius on your Linux host :

1 wget http://dmasoftlab.com/cont/download/freeradius-server-2.2.0-dma-patch-2.tar.gz
2 tar -xvf freeradius-server-2.2.0-dma-patch-2.tar.gz
3 cd freeradius-server-2.2.0

  • When you are finished it , should be like the picture :

1

  • Configuring Freeradius , “It may take 4 minutes”

1 ./configure
When you are finished it , should be like the picture :
1
2 make , “It may take 5 minutes”
When you are finished it , should be like the picture :
1
3 make install , “It may take 1 minutes”
When you are finished it , should be like the picture :
1

  • Continue, enter the following command :

ldconfig
When you are finished it , should be like the picture :
1.png

  • Testing Free Radius in Terminal :

radtest user 1111 localhost 1812 testing123
When you are finished Test , should be like the picture :
1

  • Verify freeradius installation by issuing , you need to kill the above process find the process id and then issue kill command specifying the process id .

enter the following command :
ps ax | grep radius
When you are enter command , should be like the picture :
1
kill [pid] pid ? kill 7184 Note : The PID does not have the same value each time, so you must enter ps ax | grep radius command to get in each time PID .
When you are finished it , should be like the picture :
1

  • Continue, Verify freeradius installation by issuing, enter the following command :

radiusd -X
When you are finished it , should be like the picture :
1

  • Radius Manager updates clients.conf automatically. It is necessary to set the correct permissions on the affected files On Ubuntu “Debian” :

1 chown www-data /usr/local/etc/raddb
2 chown www-data /usr/local/etc/raddb/clients.conf
When you are finished it , should be like the picture :
1

Step-8

  • Create MySQL databases and MySQL users. Follow the following MySQL command line :
  • Please enter Command of numbers from 1 to 8 in the order

1 mysql -p enter the password you entered during the installation of the mysql , like the picture ” Example ” :
1
2 CREATE DATABASE radius;
3 CREATE DATABASE conntrack;
4 CREATE USER 'radius'@'localhost' IDENTIFIED BY 'radius123';
5 CREATE USER 'conntrack'@'localhost' IDENTIFIED BY 'conn123';
6 GRANT ALL ON radius.* TO radius@localhost;
7 GRANT ALL ON conntrack.* TO conntrack@localhost;
8 exit
When you are finished it , should be like the picture :
1

Step-9

  • Installation procedure of Radius Manager , Two installation modes are available :

1. Interactive, using the install.sh script (recommended) ” We choose this option
2. Manual, with Unix commands and / or Midnight Commander.

  • * Interactive installation : The easiest way to install Radius Manager is to launch install.sh installer script. It is located in

Radius Manager tar archive and supports Redhat and Debian based systems. Before You begin , ensure You have prepared the MySQL database tables and credentials. Radius Manager requires
two databases:
1- RADIUS – Storage for system data, user base and accounting information.
2- CONNTRACK – Connection Tracking System (CTS) storage.
Create both databases even on a non CTS system.
After decompressing Radius Manager tar archive (tar xvf [filename]), set 755 permission on install.
sh and launch it. In the example below we will run install.sh on a Ubuntu “Debian” system :

  • Downloading & Installation Radius Manager 4.1.0

wget http://aacable.rdo.pt/files/rm_related/radiusmanager-4.1.0.tgz
1
tar -xvf radiusmanager-4.1.0.tgz
1
1- tar -xvf radiusmanager-4.1.0.tgz
2- cd radiusmanager-4.1.0
3- chmod 775 ./install.sh
When you are finished it , should be like the picture :
1.png

  • Follow the following commands :

./install.sh

  • Select Options like Photo :

1
When you are finished ./Install.sh , should be like the picture :
1

  • Now copy the two license files ( that you receive from DMASOFTLAB ) in /var/www/radiusmanager As shown in the picture :

1

  • Setting Permissions for Binaries , and Change Permissions & Owner for /etc/radiusmanager.cfg , Change Permissions for tmpimages :

1- chmod 775 /usr/local/bin/rmauth
2- chmod 775 /usr/local/bin/rmpoller
3- chmod 775 /usr/local/bin/rmconntrack
4- chmod 600 /etc/radiusmanager.cfg
5- chown root.root /etc/radiusmanager.cfg
6- chown www-data /var/www/radiusmanager/tmpimages
When you are finished it , should be like the picture :
1

  • Now access the admin panel from your browser , http://yourip/radiusmanager/admin.php , As showed in the image below , Default Username & Password ” Username – admin , Password – 1111 ” :

1

Step-10

  • RADIUS server: NOT RUNNING! , As shown in the picture below :

1

  • In this case we need to add the following code, in the directory /etc/rc.local

echo ---++++ Linux Syria _ Abdulkader Alrazj ++++--- && echo Please Wait Kill Port Rafdius && sleep 2s && echo Check Release Linux && lsb_release -a && sleep 2s && echo Kill All Port in 3 Sec && killall freeradius && sleep 3s &&echo System Restart Server Radius && service radiusd restart && echo System Restart Server apache2 && sleep 2s && service apache2 restart && echo ... OK ! Config By Abdulkader Alrazj && sleep 5s
When you are finished it , should be like the picture :
1
Then we restart Ubuntu reboot

  • When you Ubuntu Boot , you should as the picture below :

1

  • – Now access to the admin panel from your browser , http://yourip/radiusmanager/admin.php , Radius Auto Run “Ok ” :

1

  • In the end, a picture of the license status , If you have any questions, please send a message to my personal email, or via Facebook :

mail : alrazj.abdulkader@gmail.com
FB : www.facebook.com/AbdSenRzj
YT : www.youtube.com/channel/UCf1_mRMS_AY2B9gt-h_Pfzw
1

Zeroshell Firewall Hotpsot VPN PPPoe Radius

Zeroshell Firewall
Hotpsot – VPN – PPPoe – Radius – Proxy – Voip – MySql – PHP

images

https://zeroshell.org

  • Zeroshell is a Linux distribution for servers and embedded devices aimed at providing the main network services a LAN requires. It is available in the form of Live CD or Compact Flash image and you can configure and administer it using your web browser. The main features of this Linux distribution for Network Appliances are listed below:
  • Load Balancing and Failover of multiple Internet connections
  • UMTS/HSDPA connections by using 3G modems
  • RADIUS server for providing secure authentication and automatic management of the encryption keys to the Wireless 802.11b, 802.11g and 802.11a networks supporting the 802.1x protocol in the EAP-TLS, EAP-TTLS and PEAP form or the less secure authentication of the client MAC Address; WPA with TKIP and WPA2 with CCMP (802.11i complaint) are supported too; the RADIUS server may also, depending on the username, group or MAC Address of the supplicant, allow the access on a preset 802.1Q VLAN
  • Captive Portal to support the web login on wireless and wired networks. Zeroshellacts as gateway for the networks on which the Captive Portal is active and on which the IP addresses (usually belonging to private subnets) are dynamically assigned by the DHCP. A client that accesses this private network must authenticate itself through a web browser using Kerberos 5 username and password before the Zeroshell’s firewall allows it to access the public LAN. The Captive Portal gateways are often used to provide authenticated Internet access in the HotSpots in alternative to the 802.1X authentication protocol too complicated to configure for the users. Zeroshell implements the functionality of Captive Portal in native way, without using other specific software as NoCat or Chillispot
  • QoS (Quality of Service) management and traffic shaping to control traffic over a congested network. You will be able to guarantee the minimum bandwidth, limit the max bandwidth and assign a priority to a traffic class (useful in latency-sensitive network applications like VoIP). The previous tuning can be applied on Ethernet Interfaces, VPNs, bridges and VPN bondings. It is possible to classify the traffic by using the Layer 7 filters that allow the Deep Packet Inspection (DPI) which can be useful to shape VoIP and P2P applications
  • HTTP Proxy server which is able to block the web pages containing virus. This feature is implemented using the ClamAV antivirus and HAVP proxy server. The proxy server works in transparent proxy mode, in which, you don’t need to configure the web browsers of the users to use it, but the http requests will be automatically redirected to the proxy
  • Wireless Access Point mode with Multiple SSID and VLAN support by using WiFi network cards based on the Atheros chipsets. In other words, a Zeroshell box with one of such WiFi cards could become a IEEE 802.11a/b/g Access Point providing reliable authentication and dynamic keys exchange by 802.1X and WPA protocols. Of course, the authentication takes place using EAP-TLS and PEAP over the integrated RADIUS server
  • Host-to-lan VPN with L2TP/IPsec in which L2TP (Layer 2 Tunneling Protocol) authenticated with Kerberos v5 username and password is encapsulated within IPsec authenticated with IKE that uses X.509 certificates
  • Lan-to-lan VPN with encapsulation of Ethernet datagrams in SSL/TLS tunnel, with support for 802.1Q VLAN and configurable in bonding for load balancing (band increase) or fault tolerance (reliability increase)
  • Router with static and dynamic routes (RIPv2 with MD5 or plain text authentication and Split Horizon and Poisoned Reverse algorithms)
  • 802.1d bridge with Spanning Tree protocol to avoid loops even in the presence of redundant paths
  • Firewall Packet Filter and Stateful Packet Inspection (SPI) with filters applicable in both routing and bridging on all type of interfaces including VPN and VLAN
  • It is possible to reject or shape P2P File Sharing traffic by using IPP2P iptables module in the Firewall and QoS Classifier
  • NAT to use private class LAN addresses hidden on the WAN with public addresses
  • TCP/UDP port forwarding (PAT) to create Virtual Servers. This means that real server cluster will be seen with only one IP address (the IP of the virtual server) and each request will be distributed with Round Robin algorithm to the real servers
  • Multizone DNS server with automatic management of the Reverse Resolution in-addr.arpa
  • Multi subnet DHCP server with the possibility to fix IP depending on client’s MAC address
  • 802.1Q Virtual LAN (tagged VLAN)
  • PPPoE client for connection to the WAN via ADSL, DSL and cable lines (requires a suitable MODEM)
  • Dynamic DNS client used to easily reach the host on WAN even when the IP is dynamic
  • NTP (Network Time Protocol) client and server for keeping host clocks synchronized
  • Syslog server for receiving and cataloging the system logs produced by the remote hosts including Unix systems, routers, switches, WI-FI access points, network printers and others compatible with the syslog protocol
  • Kerberos 5 authentication using an integrated KDC and cross-authentication between realms
  • LDAP, NIS and RADIUS authorization
  • X509 certification authority for issuing and managing electronic certificates
  • Unix and Windows Active Directory interoperability using LDAP and Kerberos 5 cross realm authentication.


Br : Abd Rzj

https://www.facebook.com/AbdSenRzj

http://facebook.com/groups/arabnux

https://youtube.com/c/AbdulkaderAlrazjabd-rzj-sy

2

1

3